The in-game hub is a ready-made Roblox place that sells your store's products in game. Your store's secret hub key is already inside it, so there's nothing to paste. This guide takes you from the download to a live hub, and covers keeping the key safe.
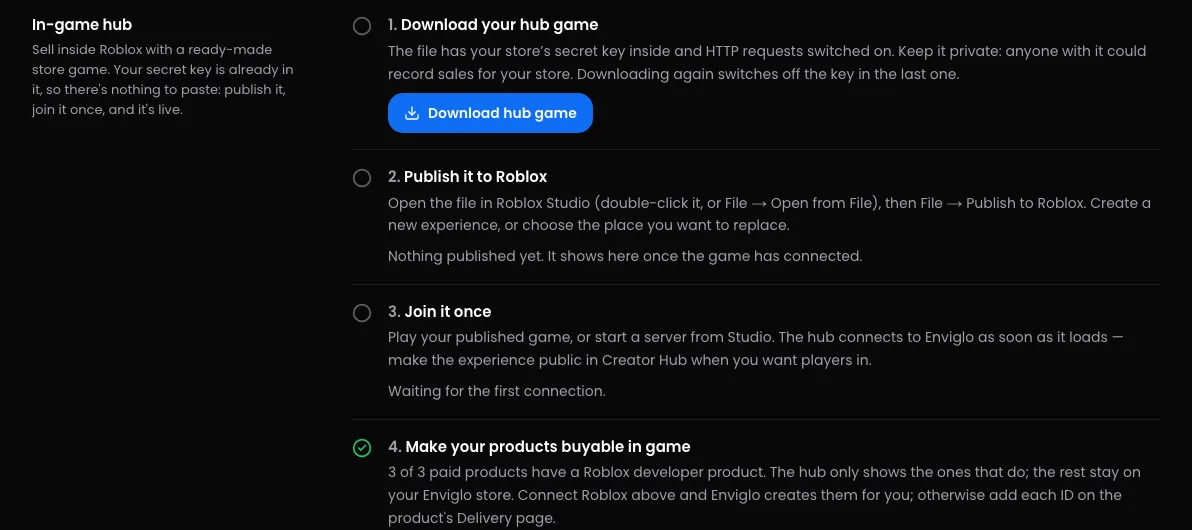
The steps match the In-game hub card in Settings → Integrations, which ticks each one off as Enviglo sees it happen.
Before you start
You need the Integrations permission. Owners and admins have it; staff need it given to them. See Roles and permissions.
You need Roblox Studio, signed in with an account that can publish to the experience you'll sell in.
Paid products need a developer product each before they show in the hub. Step 4 covers this.
1. Download your hub game
In your store's dashboard, open Settings → Integrations.
In the In-game hub card, press Download hub game.
Your browser saves a Roblox place file named after your store's address, like enviglo-hub-your-store.rbxlx. Inside it:
EnvigloHub, a script in ServerScriptService that loads Enviglo's hub module;
myPodSettings, a module in ServerStorage that holds your store's secret hub key;
HTTP requests, already switched on.
Leave the script and the module where they are.
Once you've downloaded it, the button reads Download again. Every download makes a new key and switches off the one in the previous file, so only press it when you mean to replace the key. See Replace a leaked key.
If your store came from myPod, your existing hub keeps working: its key isn't switched off by downloading this one. See Coming from myPod.
2. Publish it to Roblox
Open the file in Roblox Studio: double-click it, or use File → Open from File.
Choose File → Publish to Roblox.
Create a new experience, or choose the place you want to replace.
Publish into the experience your store sells in. Buy on Roblox sends buyers to your store's Roblox place ID, and once your Roblox experience is connected, Enviglo creates developer products in that place's experience. The card shows the experience it finds, with a link to the place.
3. Join it once
Play your published game, or start a server in Studio. The hub connects to Enviglo as soon as it loads, and the card shows the place it connected from and when it was last seen.
Publish first. Until the game is published, Studio has no place ID to report.
If your store has no Roblox place ID yet, the hub's place becomes it, so Buy on Roblox starts working.
Make the experience public in Creator Hub when you want players in.
The hub offers the product someone came for: Buy on Roblox on a product page opens your place with that developer product ready, and the purchase prompt appears once they've loaded in. They can also find it in the hub as usual.
4. Make your products buyable in game
The hub lists your published products that have a developer product, plus free ones. Paid products without a developer product stay on your Enviglo store only. The card counts how many of your paid products have one, and See the ones that can't be bought yet lists the rest.
There are two ways to give a product its developer product:
Let Enviglo create it. Connect your experience in the Roblox experience card on the same page. After that, saving a Price in Robux on a product's Pricing page creates the developer product, and later price changes follow it to Roblox.
Add your own. Create a developer product for your experience on Roblox, paste its ID into Developer product ID on the product's Delivery page, and press Save delivery.
its name, description (or its summary, when it has no description), Robux price and stock;
star ratings from its latest reviews;
a corner tag: SALE while it's on sale, otherwise Enviglo's own New, Popular or Trending label, the same as on the website;
its picture, from In-game hub image on the product's Delivery page.
Games can only draw images uploaded to Roblox, so upload the picture to Roblox and paste its image ID into In-game hub image. Products that came from myPod kept theirs.
Your store categories, under Settings → Selling → Store categories, go to the hub too, and Enviglo picks a product at random for the hub to feature. Changes you make can take a minute to show in game.
The hub also tells Enviglo the Robux prices of your developer products, and Enviglo updates your products to match, so your store shows what players actually pay.
How purchases are recorded
When a player buys in the hub, the hub reports the purchase to Enviglo with your store's key. Enviglo records it and puts the license on the player's Enviglo account, or on a placeholder account until they link Roblox. The purchase shows under Orders → Purchases, and the product shows in the buyer's library once their Roblox account is linked.
Everything that follows a sale works as usual: Discord roles and messages, and your webhooks. What buying again does depends on the product's license type: see How selling on Roblox works.
Keep the hub key secret
The key in myPodSettings lets whoever has it record sales for your store.
Don't share the downloaded file.
Don't make the place copyable. Anyone who copies it gets the key.
Keep myPodSettings in ServerStorage, which players' devices never receive. Never move the module, or the key, into a LocalScript or ReplicatedStorage.
The hub key is separate from your API keys. It isn't listed under API keys, doesn't count towards your plan's API keys, and has no API scopes, so it can't record purchases or check licenses through the API. To do those from your own scripts, make an API key: see API keys.
Replace a leaked key
In Settings → Integrations, press Download again in the In-game hub card. This switches off the old key straight away and puts a new one in the new file.
Publish the new file over your place, as in step 2.
Your live hub stops working from step 1 until you finish step 2, so do both together.
If you've built on the place since you first published it, you don't need to start over. Only the myPodSettings module changes between downloads. Open the new file in Studio, copy the source of its myPodSettings module into the myPodSettings module in your place, and publish your place.
If your store came from myPod, its old hub key is listed under API keys as myPod hub key, and downloading the hub doesn't switch it off. If that key has leaked, revoke it there. Any hub still using it stops working.
Troubleshooting
The card says Roblox doesn't know your place. Check the place is published, and that the Roblox place ID under Settings → Store → Links is right.
The card says your hub runs in one place but Buy on Roblox sends people to another. Change the Roblox place ID under Settings → Store, or publish the hub into that place.
A product is missing from the hub. It has to be published, and a paid product needs a developer product. Changes can take a minute to show.
A product has no picture in game. Set its In-game hub image on the Delivery page.
Enviglo refuses the hub with "Authentication Error: Secret key provided is incorrect or none provided." The key in your place has been switched off, usually by a newer download. Publish the latest download, or copy its myPodSettings across.
The hub can't reach Enviglo at all. In Studio, check Allow HTTP Requests is still on under Game Settings → Security. It's on in the downloaded file.
You can't see the In-game hub card. You need the Integrations permission.
The download is refused. A suspended or closed store can't download its hub: "Enviglo has suspended this store, so its hub can't be downloaded." or "This store is closed, so its hub can't be downloaded."